After repairing a long run of wooden fence panels I learned quite a lot about fence panels that's not widely understood. I’ve written this piece to help anyone thinking of replacing or buying wooden fencing, especially those modern 1800mm Euro panels.
6' Feather Edge panels
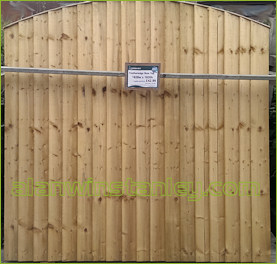 Typical feather-edge panel (bowed top)In Britain, traditional solid ‘feather edge’ panels are manufactured in 6-foot lengths. That’s 1828mm in new money. They’re usually quite robust, but they need securing to equally robust fence posts. Some people might use wooden posts driven or concreted into the ground for this. Others have used Metpost or similar metal sockets for mounting wooden posts, but opinions about them have been mixed and personally I'm not sure they are robust enough.
A more convenient way is to cement concrete slotted posts into the ground. Their H-profile allows panels to slide in and out like bread in a toaster; panels can then be replaced easily in years ahead. Also it’s worth using “gravel boards” – these cement panels slot between the concrete posts at the bottom and raise the wooden panels off the soil. This protects fence panels from damage and stops e.g. soil from borders (or your neighbours) piling up against the fence panels. The combination of concrete slotted posts and gravel boards is probably the best way of erecting wooden fencing panels to cope with Britain’s variable climate.
Various heights of gravel board are made with smooth or textured treatments that give a pleasing appearance. It’s very important to watch out for the correct length of gravel board though – for typical British feather-edge fencing, double-check for traditional 6’ / 1828mm lengths and ensure you don’t buy metric 1800mm gravel boards (see later) by mistake.
I found that although some catalogues claim their fence panels are metric 1.8m/ 1800mm wide, in practise they were NOT. They can be 6’ / 1828mm wide so you should double-check the size carefully.
The low-down on Euro 1800mm fence panels
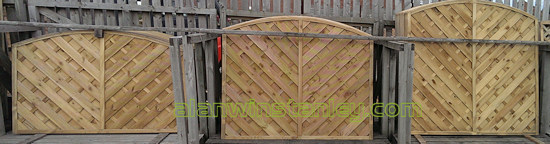 Things are more complicated when considering these more expensive fence panels (sometimes called “Euro” panels). They have various attractive lattice effects and patterns as well as straight or bow (arched) tops, and strung together in long lengths they can produce a striking and distinctive garden feature. Unlike traditional British feather-edge panels though, they are not 6’ (1828mm or 1.83m) but are metric 1800mm instead, an inch smaller. Although a number of UK timber merchants market them, the metric size gives us a clue: in fact they are made by just a handful of manufacturers in Eastern Europe (Poland I believe). UK merchants simply import them and get them own-labelled: they are all the same stuff.
I first used them back in 2007 when the designs were new in the UK, but these earliest fence panels were often stapled together rather than screwed (depending who made them) and mine haven’t weathered very well at all. From experience, the slats started bowing along their lengths and generally they sprang themselves apart and gradually self-destructed. Nor did they take well to kids banging footballs against them which loosened the slats even more! Overall the quality of these early panels was very disappointing and after 8 years I decided that mine need replacing. If you’re thinking of buying these Euro 1800mm fence panels then read on...
Euro 1800mm fence panel sizing - hints & tips!
Details of how to install H-profile concrete slotted posts are widely available on the web. It’s then simple enough to swap the panels in the future. I found I could (with some help) slide out the old ones and slot in the new ones easily enough. Before you buy replacements, here are some key points to bear in mind.
- Sizing: all ‘Euro’ panels are 1800mm wide but they are made in various heights. In the case of bowed (arched) panels, the height is the peak at the apex not at the side (shoulder). This is relevant as you need to set your concrete posts to the shoulder height, which is obviously lower than the peak of bowed fence panels. Catalogues don’t show the shoulder height unfortunately.
- The earliest bowed panels such as “Elite” almost towered over you, with apex heights of a whopping 1.95m and a 1.8m shoulder. Today, they are universally 1.8m apex with a ~1.65m shoulder (approx as measured). This size reduction was sneaked in and not even timber merchants noticed. So if you want to keep your existing concrete posts and replace earlier-type bowed panels of 1.95m peak height, you’re almost certainly out of luck. You’ll have to use 1.8m square panels instead, or put new (shorter) posts in.
- I had similar sizing issues when I wanted to swap some smaller Elite panels having bow-shaped lattice tops. The original concrete posts were set to 1.0m height, but I only found one single lattice panel that would match – Earnshaw’s Florence 1.2m (peak), which happily had a 1.0m shoulder.
- Ensure your fence panel slats are screwed not stapled. Stainless steel screws are now used to screw the slats together, and staples are a cheap no-no that will spring apart eventually.
- The newer preservatives are arsenic-free (but less effective, it’s said), but I found I’m allergic to them! I suffered a terrible itchy rash when installing them, so it’s best to wear workgloves when handling them.
- If you find yourself fitting 1800mm Euro panels into a legacy 6’ (1828mm) gap, you can sometimes buy 14mm fillet strips to screw to the panel sides to add 28mm and make them fit.
- Again, if installing gravel boards or other types of fencing, be sure to double-check sizes – either 1800 or 1828mm. I can't believe my builder cut 28mm off 15 6' gravel boards to make them fit, but he did...
After shopping around, easily the best choice of fence panels was offered by Job. Earnshaw's Fencing Centres. Established 150 years ago they make a lot of their own fence panels but Euro panels are imported in vast quantities into their Yorkshire depot. Outside of their local delivery area, you would have to arrange transport. I found them substantially cheaper than e.g. Jewson's ‘Elite’ for what amounts to pretty much the same product. I found Earnshaw’s to be first class and highly professional. They also cut and frame panels to bespoke sizes for a very nominal charge.
Tanalised timber preservative
Many such panels are made of ‘tanalised’ softwood timber which involves placing the complete panels into a vacuum chamber to draw out any moisture, then reverse the process and drive a wood preservative into the wood grain under pressure. It’s what gives the timber that light green pallor (the copper sulphate and other compounds are an anti-fungal treatment). They staple little squares of wood here and there to act like ‘feet’ that allows the gases to circulate around the panels stacked up in the chamber.
Problem was, old tantalised preservative contained arsenic which was subsequently banned. That’s also a major reason why old tanalised timber cannot and must not be used for e.g. bonfires or in barbecues. It is also said that such timber panels should not be used adjacent to food crops or allotments, due to the risk of heavy metal seepage and poisoning.
Hard to believe but my original British pressure-treated/ Cuprinolled wooden fence is still holding up after 35 years. Today's tanalised fence panels should be good for, say 7+ years but after 2-3 years they discolour and start to go silver-grey until they look very dull. Some owners paint them with a timber coating (best of luck). In my view, timber-preservative like Ronseal Fence Life is better brushed on as you can brush it into the woodgrain; it can also be sprayed on although this has resulted in legal spats against neighbours due to wind carrying the overspray and paint spattering everywhere (house, cars, windows...)
Hopefully the above practical tips will help prevent making any mistakes when sourcing and buying wooden panels.
Separately I write about how to stop wooden fence panels rattling in the wind.


 consumer tagged
;)
;)

;)
;)
;)
;)
