Entries in Home Computing (7)

Wednesday
Feb092022

Has your Google Home Hub locked up?

Google's first generation Home Hub LCD leaves owners in the lurch

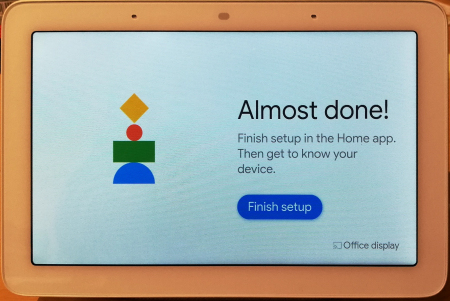
Almost done - in fact totally done...

Readers of my ‘Net Work’ column will know how I’ve recommended Google’s smart speakers in the past, mostly because their integration with the Google search engine makes them a versatile hands-free way of voicing all manner of search queries and getting a pretty meaningful response in return. And of course they integrate with compatible controls, power switches, cameras etc. too.

I’ve got several Google Mini speakers dotted around, and my desk sports a 7” LCD first generation Google Home Hub bought in April 2019. It’s in perfectly fine condition and is handy for making quick search queries, spell checking, fact finding, pulling up images, casting the odd YouTube video or playing music.

Late last year my Google Home Hub started behaving oddly: one day I found I was staring at a blank screen with coloured dots rotating around, like it had locked up. Which indeed it had, for no reason at all.

As things would turn out, I was not alone, and the terms ‘Google Help’ and ‘Google Support’ would turn out to be oxymorons because neither of them was available to hapless owners including myself.

The so-called ‘Help’ pages pointed to the usual time-wasting stuff - re-boot, re-install, factory reset etc – all to no avail.  Setup would fail at the final step.  I found the Google Home app could control the volume of the Home Hub (which beeped and booped, but little else) and nothing else worked properly: the LCD ended up with a spinning ‘G’ or coloured dots. The Google Home Hub was bricked.

Some quick tips for those who aren’t aware:

  • To factory reset your Google Home Hub, press both volume control buttons while powering up, and keep them pressed until the countdown has finished (but resetting made no difference). The usual setup routine started with the LCD displaying a code and the app being used to install it (again).
  • Check the display setup in the Home app: especially click the cogwheel and choose Device information. The firmware version etc will be displayed.
  • Check Recognition and sharing, to show your Google account details proving that it’s linked to your account properly. This proves some basic config details are set up and that the device is communicating on your network. (Scrolling down to the bottom of the setup menu, you can also delete the device from your Home app.)
  • Rinse and repeat.

Many hours were wasted resetting and re-installing my Google Home Hub all to no avail.  Searching online, the Google Nest Communities (as the device is now called the Nest Hub) had filled up with owners of these first generation Google Home Hubs having the same problem: their devices have bricked. No solution was offered, but the forums contained mindless boilerplate replies from moderators that a Case Number had been raised, thank you for your patience, etc., to fob users off.

The consensus amongst owners is that an OS or network upgrade had bricked these Home Hubs. That’s right: it seems that Google had crippled their own devices without an apology but wouldn’t do anything to fix them. This perfectly good hardware has suddenly been rendered useless.

I was fobbed off with more excuses (‘all cases are being dealt with individually’, etc.) until the truth sank in: after 2½ months Google has no solution nor any offer to fix the problem.

In my view Google probably hopes that disgruntled owners of first gen. Home Hubs will just give up and toss them away. As at today the excellent-condition LCD is worthless. And if you rely on it for managing your Nest devices, you’re out of luck. Second generation Nest Hubs cost £55 retail, and some more forgiving users are simply buying a new one. Not me though.

Speaking for myself, it’s unforgivable that a perfectly good working device should be knobbled and bricked through no fault of the owner. No support, no help, no answers, no solution - if that’s the best that I can expect from Google hardware, I’m switching to Amazon Echo, which carry a four year warranty for software updates.

The IT website The Register also picked up on my story here: https://www.theregister.com/2021/11/16/google_nest_hub/

Eventually I found the cardboard box the thing came in, and there's a clue in the small print T&C printed on the side: ..." All features, functionality, and other product specifications are subject to change without notice or obligation." ...  So presumably that includes pulling the plug on it altogether without warning.

I asked for an explanation but had no response from Google’s Press Office.

The Google Mini smart speakers that I mentioned above, also now have problems of their own: there is a 5 second delay before they respond, so they will likely end up in the bin as well.

Have you got any solutions or workarounds? Please post a comment below. No logins or ID are needed.


Friday
Apr032015

Corsair Carbide 300R flickering LED fix

Some Corsair Carbide 300R owners have mentioned a flickering LED problem with their PC cases – and I too got the same problem soon after I built a new PC. The white PWR LED would start to flash (as if going into Standby), then flicker, then (in my case) go off altogether. I thought it might be Windows power settings causing the PC to shut down, but it wasn’t. Jiggling the pin header on the motherboard made no difference.

Asus Tech Support guessed that the motherboard probably had a faulty header (unlikely) that "cannot output current on that channel.  If necessary I should try using a different PSU with my motherboard. Contact the retailer if the issue persists... " I was none the wiser – was the motherboard, PSU or PC case at fault?

I believe in checking the simplest things first so I assumed the motherboard and PSU would be fine. I decided to test the LED itself with a separate p.s.u. – see later. To access the LEDs the Corsair Carbide 300R front panel must be removed.

Remove the four screws on the corners of the front panelRemove both side panels to reveal the front panel’s steel spring studs on the chassis.  Four hex screws must first be undone on the corners of the front panel. The four screws on the grille are for decoration and can be left alone.

Then pop off the front panel using a plastic pry toolAfter removing the four screws, pry off the front panel using a plastic tool (such as the sort to remove car trim panels, or a plastic pry tool used to take gadgets apart). Be firm but not brutal and the front panel will then pop off without a problem. The DVD drives remain in place.

A single screw holds the LED/ switch panel in placeThe switch/ LED panel is held in place with one screw. Remove it and the panel will loosen.

Using a bench PSU to test the LED - it litI could then access the PWR LED for testing with a separate variable voltage PSU.  I carefully powered up the LED from zero volts (maximum, say 5V d.c. or so), observing the correct polarity  and it lit up OK to begin with.

The series resistor fell off the LED - the solder joint fracture caused the flicker problemSo (assuming the motherboard header was OK) maybe the fault was a loose connection somewhere. It turns out the LED has a series limiting resistor within the heatshrink sleeve (blue-grey-black-gold = 68 ohms, estimated 1/8 watt). I jiggled the wires and the LED started flickering. In fact the resistor lead then fell off altogether, so the poor connection was the likely cause.

In my view the problem’s caused by the lack of any strain relief on the Corsair Carbide wiring loom, or, the LED soldering was a dry joint. When routing the wires through the case and hooking them onto the motherboard, it’s probable that this strained the LED soldered joints and eventually caused them to fracture.

The broken solder joint. The LED and resistor were replaced.Not recommended for beginners, but I replaced them myself with a spare 68 ohm (¼W) resistor and a white 5mm LED.  I soldered and heatshrinked these onto the end of the existing wires (observing polarity of course) and reconnected them to the motherboard header and everything worked.

After contacting Corsair Tech Support and emailing proof of purchase, they immediately rushed a new switch/ LED / front panel wiring loom assembly next day. Corsair's support and repair service was fautless, even during a holiday period.  The Corsair Part No. is  CC-8930041

Sunday
Dec212014

Omiga-Plus Search can get lost

IE 11 Search home page hijacked by Omiga-Plus searchDeleting the Omiga-Search Plus adware browser hijacker

A combination of my speedy new PC, my failing eyesight, poor flat screen LCD contrast and an errant mouse-click while googling around, meant that my brand new installation of Windows 7 Professional got itself a browser hijack right before my very eyes. Curses. My Google home page in IE 11 was hijacked by Omiga-Plus Search - a useless, third-rate duff search page with some garbage links to gambling, gaming and other junk.

Avast Anti Virus 2015 detects Win32.SupTab (used by Omiga-Plus Search browser hijacker) [click to see]It seems my Avast Anti Virus 2015 immediately blocked a blizzard of no less than eleven objects of Win32.SupTab, one straight after the other as it tried to nail itself into my brand new system. It happened so quickly that I didn’t know what was going on (until I launched IE11), but mercifully Avast seemed to block any immediate threats. Despite this, my Search home page still opened at Omiga-Plus Search every time I opened Internet Explorer.

Dubious adware like this poses a risk as you never know what else such low-grade unsolicited adware is capable of doing. It needs deleting immediately and the first place to go in IE11 is Tools / Internet Options / General tab – home page section and ensure nothing strange is there as a home page address. Make it eg www.google.com to be safe. In theory Google should then appear as your home page.

(NB if you can’t see ‘Tools’ ‘Help’ etc along the top of IE11, right-click anywhere in that area and tick Menu Bar to enable it.)

This did not cure the problem. So then go to Start – Control Panel / Programs/ Uninstall a Program and see if there’s anything strange there to uninstall. There wasn’t. Next option is (IE 11) Tools / Manage Add Ons, to see if something needs disabling there. (Nope!)

I then installed my trusted go-to software for such problems, Malwarebytes from http://www.malwarebytes.org  only. Don’t Google for it because so many phony links will try to con you into downloading a duff lookalike. (Scumbags!)  No problems were reported by Malwarebytes, and a full disk scan by Avast also drew a blank. Using free CCleaner 5 from Piriform.com to scan the Registry showed no results either. It did seem that Avast had nipped this in the bud (some SupTab objects now appear in the Virus Chest), yet the darned Omiga-Plus Search page still kept launching whenever IE was opened.

Last resort is to reset the browser back to factory defaults (already? Only had it a few hours...) -  go Tools/ Internet Options/ Advanced / Reset... button.  Even this still did not stop my browser from launching with Omiga-Plus Search as its home page. My system appeared to be clean so the problem must be elsewhere.

Remove reference to Omiga-Plus website in the shortcut Target properties.The answer lay in the Windows shortcut to Internet Explorer 11. This too had been hijacked to ensure the unwanted Omiga-Plus Search opened as the home page.  So find your IE 11 button or shortcut (eg in your Start menu), then right-click – go Properties / Shortcut tab

In Target it should show “C:\Program Files\ Internet Explorer\iexplorer.exe”  with quote marks only.  In my case it showed extra stuff after that  http://search.omiga-plus.com/[blah blah]. It’s this that causes IE11 to open on their home page. Delete this extra string of characters. If you have made any shortcuts (eg copied onto your Task bar), delete them altogether. Now Internet Explorer 11 will launch with Google.com (or your choice of search) as the home page and Omiga-Plus Search is gone.

Friday
Dec052014

Celebrating the Ambra PC – the computer that so nearly broke the mould

Updated on Thursday, September 24, 2015 at 4:17PM by Registered CommenterAlan W

In 1992 along came Ambra, an IBM-compatible PC made by an offshoot of IBM themselves, called ICPI (Individual Computer Products Ltd.). It could have been maybe too good for IBM's own good and it was mercilessly axed by IBM after just a few years. This stylish PC was smart, fast and aggressively priced. Some reprints of original Ambra literature from 1992/ 93 are included in this article.

Click to read more ...

Wednesday
Aug132014

Wacom Intuos Graphire tablet GD-0608-R between XP and W7

Updated on Wednesday, January 29, 2020 at 11:52PM by Registered CommenterAlan W

The old Wacom Intuous Graphire serial graphics tablets are supposedly not compatible with Windows 7, so says Wacom, but I got mine running and also shared it with a Windows XP PC using a data switch. This article explains what's needed, with handy links to Wacom's driver library too.

Click to read more ...

Thursday
Jun142012

To catch a Troll

I keep hearing about Internet “trolls” and how some “victims” of trolls have recently forced Facebook to reveal the identities of their online attackers. But what is a troll? I correct one or two popular misconceptions in this article.

Click to read more ...

Friday
Apr062012

What's a KVM? Using the Aten CS22U Keyboard Video Monitor switch

I have two PCs running side by side that I wanted to control with a KVM (keyboard-video-monitor) switch. One PC runs W98 and hosts my accounts, and has VGA video. The other has DVI. Here's how I managed to configure an Aten CS22U USB KVM to do the job.

Click to read more ...